
Part 1: Freud the Swift ML Library
Part 2: Core ML, Shazam for Images
Pt. 1: Freud the Swift ML Library
Freud is a Swift (3) machine-learning library dedicated to Sigmund Freud. This Library is implemented under the ‘Ego’ philosophy.
The ego attempts to mediate between id and reality.
Swift has been my favorite programming language of all time since the day Apple released it and playing with Swift is my daily joy. Last year when I was browsing GitHub I came across this project Swift AI by Collin Hundley and decided to try it out because everyone is crazy about it. Later I found out that Swift AI is in Swift 2.2 and by then Swift 3 had been out for months already. I could not compile it of course.
Everyone knows Xcode was not good at converting Swift 2 to Swift 3. Given that Xcode converting and minor modifications on the code would not work at all, I decided to rewrite the Swift AI project in Swift 3, and that’s why Freud is here.
And I know Swift 4 is out here now so I’m now doing some converting work.
Features
Freud includes a set of common tools used for machine learning and artificial intelligence research. These tools are designed to be flexible, powerful and suitable for a wide range of applications.
- [x] Feed-Forward Neural Network * 3-layer network with options for customization. * Example projects for iOS and OS X.
- [ ] Recurrent Neural Network
- [ ] Convolutional Network
- [ ] GPU-Accelerated Networks
- [x] Genetic Algorithms * Generic Typed Genetic Algorithm (Undergoing) * Asexual & Sexual Production * Example Project for iOS
- [x] Fast Matrix Library * Matrix class supporting common operators * SIMD-accelerated operations
- [ ] Fourier Transform Functions
What It’s For
"This is a really cool project, but what can I actually do with it? I know nothing about A.I."
(The following is quoted from Collin Hundley)
I get this question a lot, so I want to address it here:
Freud focuses on a useful branch of artificial intelligence known as machine learning: the science of training computers to take actions without explicit programming. Used appropriately, these tools can give your applications abilities that would normally be impossible or unrealistic using conventional programming techniques.
As an example, consider an app that recognizes handwritten letters on a piece of paper: using the computer science you learned in school, you might be tempted to write each of the rules for classifying each character individually. This would consist of extracting pixel data from the image, reading them in individually, and writing an extremely complicated mathematical model that relates pixel darkness/position into a probability for the letter A, and then likewise for B, C, D, etc. Sound fun? Here’s what your program might eventually look like:
if /* massive function for checking the letter A */ {
    return "A"
} else if /* massive, completely unique function for checking the letter B */ {
    return "B"
} else if ...
Hopefully you’ve realized by now that this method simply isn’t feasible. In the best case scenario, you might end up with thousands of lines of very unreliable code for recognizing only your exact handwriting. In comparison, Swift AI’s iOS example app demonstrates how far superior functionality can be accomplished with very few lines of code, using machine learning. And requiring exactly zero explicit rules to be written by the developer.
So how can Freud be used in the real world?
Here are a few ideas to get you started:
- Handwriting recognition
- Gesture recognition
- Facial detection
- Drone stabilization and navigation systems
- Predicting and identifying medical conditions
- Song identification (e.g., Shazam)
- Speech recognition
- Video game AI
- Weather forecasting
- Fraud detection
Inside Freud: Genetic Algorithm
Note that I implemented GA with struct instead of class.
Why I Chose Struct Over Class
What’s good about struct?
I always believe that, in most cases, we should use Value-Type over Reference-Type. Here class is the Reference-Type and struct is the Value-Type.
-
Reference-Type is unsafe and confusing to new learners in some way.
class Foo {
  var a: Int = 1
}
let fooInstance = Foo()
let fooInstance1 = fooInstance
fooInstance1.a = 2
print(fooInstance.a) // gets 2. This is how reference type works
struct Foo { var a: Int = 1 } let fooInstance = Foo() var fooInstance1 = fooInstance fooInstance1.a = 2 print(fooInstance.a) // gets 1. This is how value type works -
Struct is way more efficient than class
Struct instances are allocated on stack while class instances are allocated on heap, which makes struct drastically faster than class in some cases.
Quoted from StackOverflow
According to the very popular WWDC 2015 talk Protocol Oriented Programming in Swift (video, transcript), Swift provides a number of features that make structs better than classes in many circumstances.
Structs are preferable if they are relatively small and copiable because copying is way safer than having multiple reference to the same instance as happens with classes. This is especially important when passing around a variable to many classes and/or in a multithreaded environment. If you can always send a copy of your variable to other places, you never have to worry about that other place changing the value of your variable underneath you.
With Structs there is no need to worry about memory leaks or multiple threads racing to access/modify a single instance of a variable.
Classes can also become bloated because a class can only inherit from a single superclass. That encourages us to created huge superclasses that encompass many different abilities that are only loosely related. Using protocols, especially with protocol extensions where you can provide implementations to protocols, allows you to eliminate the need for classes to achieve this sort of behavior.
How Do I Use The Algorithm
There are asexual ga and sexual ga.
Asexual Production means the algorithm uses no mating. An individual generates a new one only by duplicating itself and mutates a little bit.
Sexual Production means the algorithm uses mating. In mating there are chances of chromosome-crossover and mutation.
If you wanna do Asexual GA, just initialize a population with only one individual. Make it mutate and calculate the fitness and compare it with the the previous one and the better one survives. Doing this kind of loop is going to help you maximize the finess and then you’ve got the greates kind during the evolution process.
If you wanna do sexual GA, just initialize a population with multiple (numbers may be randomized) individuals. Sort them in the order of their fitness and those with higher fitness has better chances to mate with others and generate new individuals. So you get a new generation of individual by mating the previous sorted individuals and self-mutation, calculate the the total fitness and compare it to the previous generation, and the better one survives. Doing this kind of loop helps you maximize the total fitness of a generation and you’ve then got the greates kind of generation during the evolution process.
In Sexual GA, Why Not Just Dump The Lame Ones?
The fitter an individual is, the better chances the individual has to survive right? So why not just dump those lame ones coz their genes are not fit?
We’re not dumping the lame ones. Instead, we’re still giving the lame ones chances to mate with others, their chances being smaller though.
Here’s why:
Once the fitness has been calculated for all members of the population, we can then select which members are fit to become parents and place them in a mating pool. There are several different approaches we could take here. For example, we could employ what is known as the elitist method and say, “Which two members of the population scored the highest? You two will make all the children for the next generation.” This is probably one of the easier methods to program; however, it flies in the face of the principle of variation. If two members of the population (out of perhaps thousands) are the only ones available to reproduce, the next generation will have little variety and this may stunt the evolutionary process. We could instead make a mating pool out of a larger number—for example, the top 50% of the population, 500 out of 1,000. This is also just as easy to program, but it will not produce optimal results. In this case, the high-scoring top elements would have the same chance of being selected as a parent as the ones toward the middle. And why should element number 500 have a solid shot of reproducing, while element number 501 has no shot?
For example, in the case of evolving "to be or not to be", we might have the following elements:
A: to be or not to go
B: to be or not to pi
C: xxxxxxxxxxxxxbe
As you can see, elements A and B are clearly the most fit and would have the highest score. But neither contains the correct characters for the end of the phrase. Element C, even though it would receive a very low score, happens to have the genetic data for the end of the phrase. And so while we would want A and B to be picked to generate the majority of the next generation, we would still want C to have a small chance to participate in the reproductive process.
Evolution of Mona Lisa
A Genetic Algorithm Demo
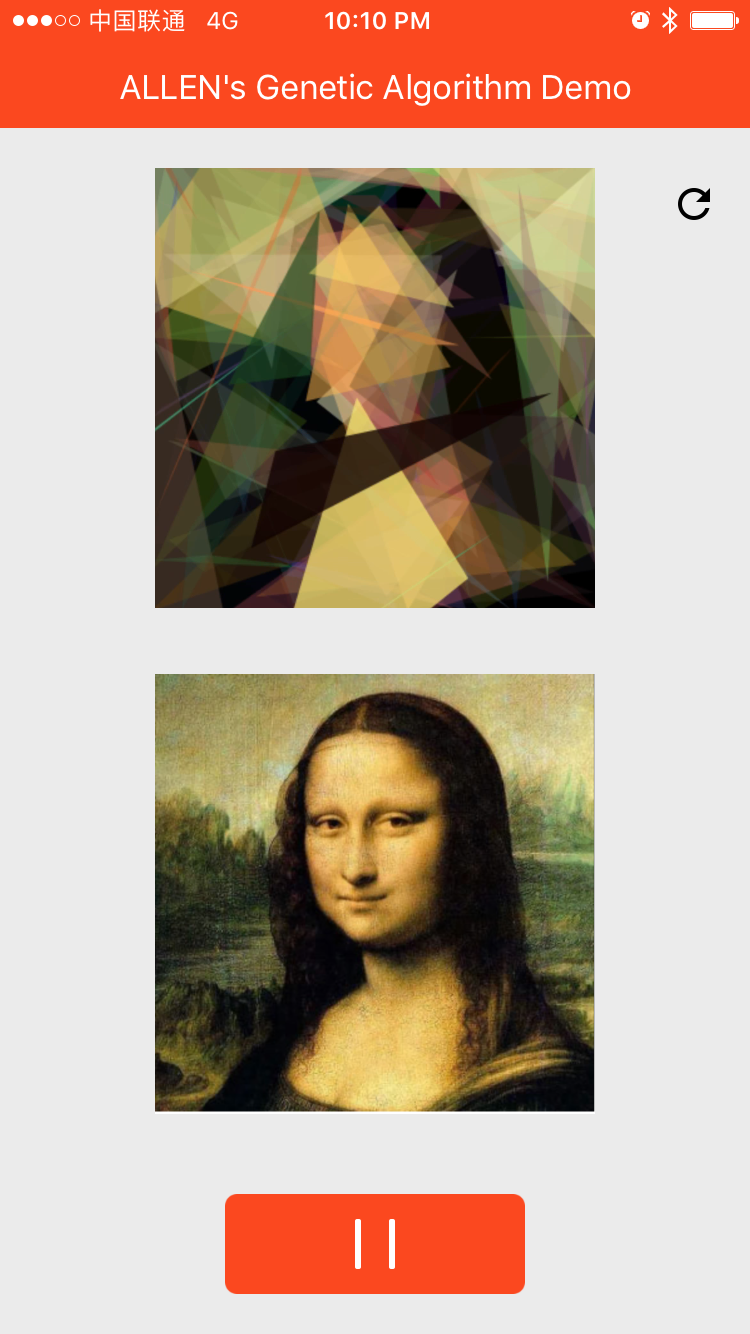
What It’s About
The demo app uses Genetic Algorithm to help a bunch of polygons to evolve to the target image, Mona Lisa here.
Play with It
Factors.swift
The demo app has a file named Factors.swift which stores all the mutation rates and other parameters to help polygons evolve. You can change it and see how it goes.
Pt. 2: Core ML, Shazam for Images

I had this Image Processing class last semester and the teacher asked us to do a project based on some published paper. When iOS 9 brought the Metal Performance Shader API to us. Because Metal Performance Shader enabled developers to use Apple Devices’ GPU for more general purposes (as in GPGPU), People were using Metal Performance Shader to construct Neural Network and do image recognizing and stuff. So it came to me that I could use MPS to implement a Neural Network published on some paper and do image processing.
Google’s Inception V3 came to me.
Inception V3
Powered by the beloved and powerful TensorFlow, Inception V3 achieves very high precision classifying images into 1000 classes defined in ImageNet.
(ImageNet is a common academic data set in machine learning for training an image recognition system.)
In the paper Rethinking the Inception Architecture for Computer Vision, Google presented Inception V3.
In designing Inception V3, there are a few design principles based on large-scale experimentation with various architectural choices with convolutional networks:
- Avoid representational bottlenecks, especially early in the network.
- Higher demisional representations are easier to process locally within a network.
- Spatial aggragation can be done over lower dimensional embeddings without much or any loss in representational power.
- Balance the width and depth of the network.
Specifically, compared with Inception V2, one improvement Google made was factorizing convolutions with larger spatial filters into smaller convolutions. This setup clearly reduces the parameter count by sharing the weights between adjacent tiles.
Below is the structure of Inception V3:
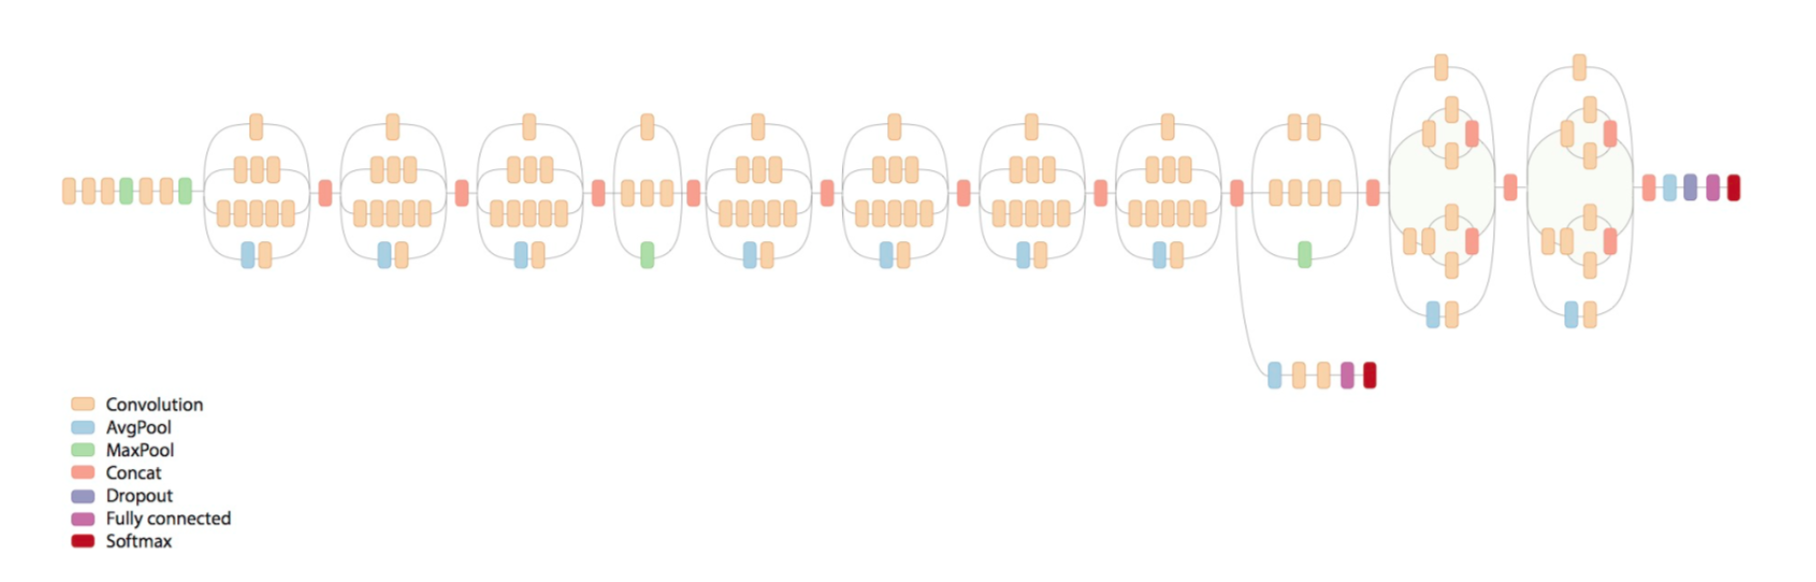
Google has made the Inception V3 model in TensorFlow and released pretrained weights (trained with the dataset from ImageNet) so we can use them directly.
Constructing Inception V3 with Metal Performance Shader
The CNN creates, encodes, and submits different layers to the GPU. It then performs image recognition using trained parameters (weights and biases) that have been acquired and saved from the pre-trained network.
So how do we construct the network Inception V3?
There exists a class MPSConvolution that lets us to instantiate a convolution by simple passing in some essential parameters like kernel width and stride.
let conv0, conv1, conv2, conv3, conv4 : SlimMPSCNNConvolution
let m0t0conv0, m0t1conv0, m0t1conv1, m0t2conv0, m0t2conv1, m0t2conv2, m0t3conv0 : SlimMPSCNNConvolution
let m1t0conv0, m1t1conv0, m1t1conv1, m1t2conv0, m1t2conv1, m1t2conv2, m1t3conv0 : SlimMPSCNNConvolution
let m2t0conv0, m2t1conv0, m2t1conv1, m2t2conv0, m2t2conv1, m2t2conv2, m2t3conv0 : SlimMPSCNNConvolution
let m3t0conv0, m3t1conv0, m3t1conv1, m3t1conv2 : SlimMPSCNNConvolution
let m4t0conv0, m4t1conv0, m4t1conv1, m4t1conv2, m4t2conv0, m4t2conv1, m4t2conv2, m4t2conv3, m4t2conv4, m4t3conv0 : SlimMPSCNNConvolution
let m5t0conv0, m5t1conv0, m5t1conv1, m5t1conv2, m5t2conv0, m5t2conv1, m5t2conv2, m5t2conv3, m5t2conv4, m5t3conv0 : SlimMPSCNNConvolution
let m6t0conv0, m6t1conv0, m6t1conv1, m6t1conv2, m6t2conv0, m6t2conv1, m6t2conv2, m6t2conv3, m6t2conv4, m6t3conv0 : SlimMPSCNNConvolution
let m7t0conv0, m7t1conv0, m7t1conv1, m7t1conv2, m7t2conv0, m7t2conv1, m7t2conv2, m7t2conv3, m7t2conv4, m7t3conv0 : SlimMPSCNNConvolution
let m8t0conv0, m8t0conv1, m8t1conv0, m8t1conv1, m8t1conv2, m8t1conv3 : SlimMPSCNNConvolution
let m9t0conv0, m9t1conv0, m9t1conv1, m9t1conv2, m9t2conv0, m9t2conv1, m9t2conv2, m9t2conv3, m9t3conv0 : SlimMPSCNNConvolution
let m10t0conv0, m10t1conv0, m10t1conv1, m10t1conv2, m10t2conv0, m10t2conv1, m10t2conv2, m10t2conv3, m10t3conv0 : SlimMPSCNNConvolution
let fc0 : SlimMPSCNNFullyConnected
But by using this kind of low-level API to construct a neural network results in, as you can see above, tons of lines of code with lots of repeated lines. It’s like writing in an Assembling Language, a total pain in the ass.
So we want elegant encapsulation of these APIs. We came into a great implementation that encapuslates these APIs so great that we can reduce the lines of code using the framework’s DSL in a large scale.
From then on we can write very declarative code to construct our Inception V3 just as follows:
let input = Input()
let entryPoint = input
            	 --> Resize(width: 299, height: 299)
            	 --> Activation(linear)
            	 --> Convolution(kernel: (3, 3), channels: 32, stride: (2, 2), padding: false, activation: reLU, name: "conv")
            	 --> Convolution(kernel: (3, 3), channels: 32, padding: false, activation: reLU, name: "conv_1")
            	 --> Convolution(kernel: (3, 3), channels: 64, padding: true, activation: reLU, name: "conv_2")
            	 --> MaxPooling(kernel: (3, 3), stride: (2, 2))
            	 --> Convolution(kernel: (1, 1), channels: 80, padding: false, activation: reLU, name: "conv_3")
            	 --> Convolution(kernel: (3, 3), channels: 192, padding: false, activation: reLU, name: "conv_4")
            	 --> MaxPooling(kernel: (3, 3), stride: (2, 2))
It’s that simple.
But it’s still not simple enough.
Constructing Inception V3 with Core ML
Even with that beautiful 3rd-party encapsulated DSL for Metal Performance Shader, we still have like thousands of lines of code to construct the neural network. Good thing is, we’ll never have to use raw, low-level API of Metal Performance Shader because Apple introduce Core ML in iOS 11.
Lucky us, in Core ML, all we do is like this:
let image = UIImage(named: "foo")
let model = Inceptionv3()
model.predict(image: image).map {
    print($0.name + " \($0.probability)")
}
Note: The above code is not really doable because Core ML models does not predict UIImage instances directly. I write like this because I extended the implementation of the the predict method so it can predict UIImage instances.
In Core ML, we simple use Apple’s python tools to convert our trained neural network models from Caffe or whatever into Core ML models. We then drag the Core ML models into our project and BAM, our model in Swift is available as a class, class InceptionV3 for example.
With Inception V3 and Core ML I made my image recognizing app called Shazam for Images which, like its name, can detect objects and recognize them in real time.
To make the recoginition go real-time you would need to handle data from camera really carefully. What I did was bascally predicting 6 frames of data per second and it worked great.